A compact, easy to build, sub-$100 direction finding setup
Utilizing a small 70cm Yagi and a Quansheng UV-K5 radio running modified firmware you can hunt and locate signals and RFI sources quickly, with a simple, easy to use direction finding rig that requires minimal investment and assembly.
In this article I am going to talk about my experience with power line RFI, the equipment I put together to hunt it, and how I was able to effectively find it without needing to purchase expensive specialty equipment. The direction finding rig that I have developed costs under $100, is made of commonly available parts that can be sourced from someplace like Amazon. Since its inception it has proven very effective in finding sources of RFI.
Before Hunting RFI: Determine if Local or External
External RFI could be affecting your station but it’s not always the primary issue. You can have RFI issues from local sources in your QTH that can be causing interference as well. Before starting to hunt RFI outside of your house you need to find out if the RFI is actually being caused by something in your house. It is the first step in effectively hunting RFI. To do this takes a little planning and some effort but costs you nothing but your time.
It’s recommended you investigate and verify that your noise is coming from an external source before going hunting in your neighborhood. The N8GMZ RFI Hunting Rig, being as small and compact as it is, is an excellent tool for finding RFI sources in the house. I recommend utilizing it for this purpose as well, on top of using it for hunting power line noise.
What my Power Line Noise sounds like:
This noise in the video above is distinctly power line noise. Take note of how it sounds. If your noise does not sound similar, you may be dealing with something else, like an inverter, invisible dog fence, or solar controller possibly.
The waterfall is also representative of the very broadband RFI caused by arcing somewhere in the nearby power grid. The view is 1000k wide, and the RFI covers all of it, and more.
When it rained the noise would get worse, a classic symptom of power line noise.
I was convinced that the growing RFI problem needed to be dealt with, that it wasn’t going to go away on its own, and that I would need to hunt it down myself to improve my situation.
You Are Not Alone!
I certainly didn’t do this all by myself. My journey that eventually lead to successfully hunting RFI would not have been possible without the help of others, especially Jeff Stuparits, W4DD, the creator of the RFI hunting software “RFI Mapper”.
Jeff was on the receiving end of many of my questions, and even made himself available to me via a Zoom call to review the RFI issues I was having. Much of my knowledge in this area is based off the work he has done, and the methodology that he uses. Jeff has worked with many hams, and the ARRL, on numerous RFI cases, and is very knowledgeable with how to successfully find and eliminate RFI interference from external sources.
You can find some of Jeff’s seminars and RFI hunting experiences here:
AWA Communication Technologies Museum – Hunting Down Power Line Noise and Other RFI
East Coast Reflector – Jeff W4DD Presentation of RFI – Presentation View
GarsTube – Locating Power Line and other RF Noise Jeff Stuparits, W4DD
Don’t feel like your problem is yours alone. Seek out help with the issue. Ask questions if you’re unsure. Trying to tackle something like this takes more thought than just putting a radio together and waving an antenna around. It’s rough, and there are people out there that are willing to help if you ask.
The Beginnings of the N8GMZ RFI Rig
After speaking with Jeff multiple times, and being told that the noise I was hearing was almost certainly power line noise, he recommended that I hunt it myself. The power companies historically are, for the most part, ill-equipped and untrained in RFI hunting outside of verifying a piece of equipment that someone else has already determined to be suspect for some reason. Isolating the pole(s) the RFI was coming from would give me the best chance for getting it resolved quickly. I didn’t want to leave it to a power company employee to try to find.
Jeff recommends using a 2m Yagi antenna, a multi-level attenuator, and a radio that does AM air band (136MHz). This is the tried and true method for hunting RFI. Many examples of this method are documented online and if you have this equipment available and want to explore this option, some light searching will bring up good references to go off.
I did not follow this method, and instead went my own way.
Without getting into the technical side of what a power line RFI signal is, just know it is very broadband, and you will be able to find it using almost any band, but may not be able to find it when in some narrow mode like SSB or CW. However it is usually very noticeable in AM mode.
Being able to do AM mode is key in hunting power line RFI, and will provide you the best results.
I did not have an AM air band radio… or an attenuator… or a 2m Yagi antenna. My West Michigan Dutch-blooded frugalness was kicking in, I wanted to find a solution with low cost and already available equipment. I baulked at the idea of going out and buying a bunch of gear for this endeavor.
Jeff suggested building the 2m Yagi instead of buying one, and provided me with his personal and proven design for it. That was a low cost option, absolutely. But when I responded and mentioned that I had a cheap $40 3 element 400-470MHz Yagi that I had purchased previously to do foxhunting with, Jeff responded positively, saying that a fellow RFI hunter he knew used 70cm to hunt RFI with good success, and it could be worth a try, if I could find a 70cm AM radio.
It so happened that along with the 70cm Yagi antenna, I had a Quansheng UV-K5(8), also called a UV-K6. This is a $20-30 VHF/UHF FM handheld 5w radio that is hackable. I love these little radios. They are great fun to play around with but many agree most of the modifications that you can do don’t have much practicality outside of being experimental toys. I had gotten mine on sale for $18 and it had sat around after the initial novelty wore off, but I knew it would do AM on any band.
The modifications I knew about, being able to do AM, FM, or USB modes from 18MHz to around 1300Mhz, as well as a spectrum scope mode for scanning a range of frequencies, caught my interest for RFI hunting right away. It would give me a wide look in AM mode on the 70cm band, letting me hone in on the RFI signature quickly.
Transmitting out of band on these radios without additional hardware modification is not great, or approved by the FCC, but using it for RFI reception on AM seemed very promising to me, especially with the spectrum scope feature to assist with locking on to the RFI signature peak.
As I looked into it more, I found you can also change the radio’s amplifier gain with the modified firmware, giving me software based attenuation that is needed in direction finding of RFI. It seemed like this combination of thing could work, in theory.
I couldn’t find where anyone else had done this before but was willing to try it.
I loaded the latest version of the modified firmware, called EGZUMER, on to my radio for the experiment. You can load it via a browser and a programming cable. There are many write-ups on how to load EGZUMER so I won’t get into it here, but it’s very easy to install.
I then hooked it up to my little 70cm Yagi and went hunting.
Attempts at Chasing the RFI
My first attempts to find the power line noise with this sub $100 rig were initially unsuccessful. I was still learning to navigate the EGZUMER software, and dial in the settings to hone in on the RFI.
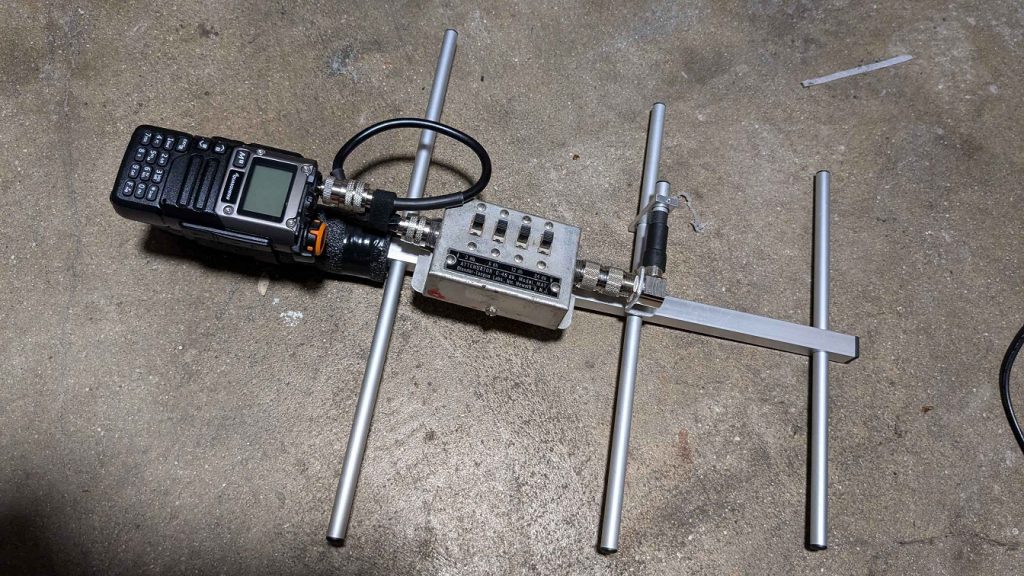
During these trials with the RFI rig, I ended up finding a multi-step attenuator on eBay for a decent price and added it to the rig in the hopes that it would help me.
However, I discovered that since I was using a Yagi antenna with a relatively low gain, adding the attenuator would quickly reduce the signal to where it was difficult to detect from any distance. While I ending up not needing the attenuator and removing it from the final version, this early setup, shown below, is typical of RFI hunting rigs where attenuation can not be done on the radio via software.
It took some more experimenting with the rig and a lot of trial and error, but eventually, around the forth or fifth expedition out into the neighborhood, I was able to locate the power line RFI, track it down using direction finding, and narrow it down to a single pole. I then called it in to the power company. An engineer came out and verified it using his own RFI sniffing equipment. This generated a service order to be created to repair the pole to fix the issues.
More Rig Details
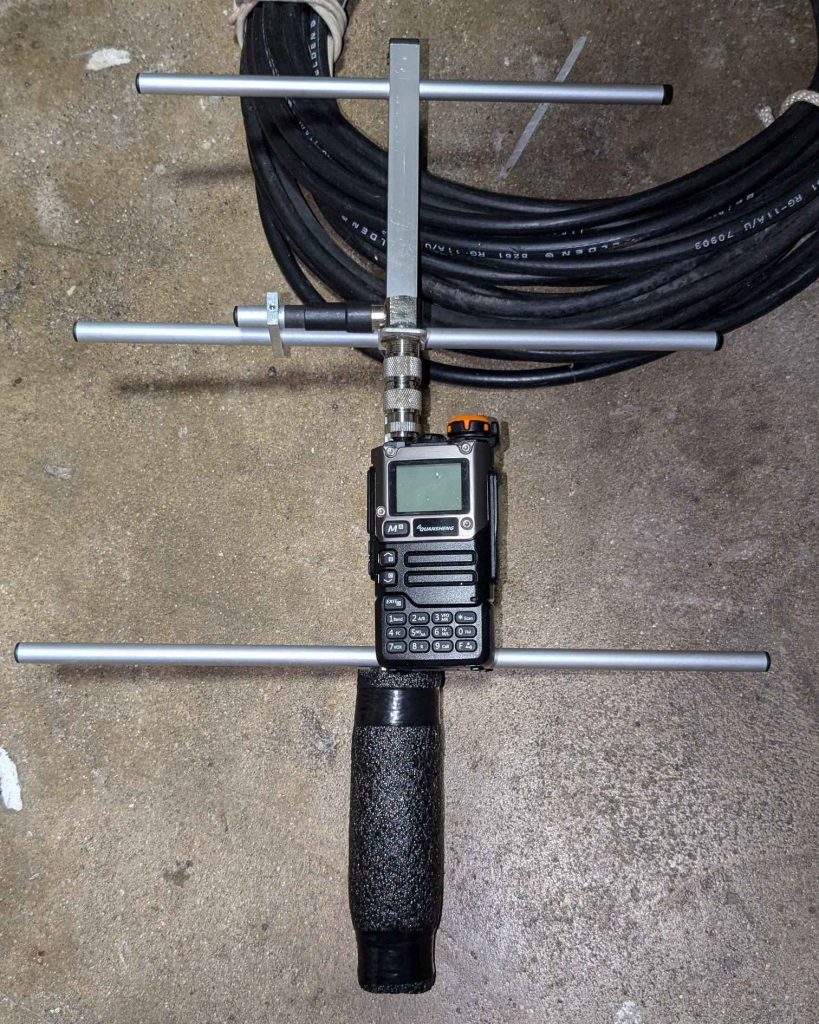
The photo below shows the second version of my rig. It consists of my “Amazon special” 3 element 400-470MHZ Yagi, a Quansheng UV-K5(8) radio, a male to male SO-239 coupler, and a female SO-239 to female SMA adapter. The handle is a piece of hot water pipe insulation. Much of this I already had, but if it were to be purchased, the cost would be under $100, including the programming cable needed to load the modified firmware. This rig is small, and can be easily used inside houses, or kept on the passenger seat of your vehicle during RFI hunting expeditions.
Whoops! I made it worse
During testing I found that having the radio directly coupled to the antenna, as shown above, desensed the receiving capability greatly for some reason. This was discovered while hunting a weak RFI signal for a local Ham at his QTH. He had a short patch cable, which we installed to move the radio back behind the reflector element. We then almost immediately found the RFI he had been hearing.
It is recommended to have the radio mounted further back, with a 1′ patch cable (as shown in the earlier photo of the radio with the attenuator installed). You could also use a longer patch cable, and hold the radio in one hand, and the antenna in the other.
Using EGZUMER for Directional Signal Finding
This is the heart of things and is where you will find success in your RFI hunting endeavors.
We’re going to assume you have a directional antenna with gain off one end – The 3 element Yagi I used has a rated gain of 7dBi, providing some directionality in pinpointing the RFI.
We’ll also assume you have a UV-K5 or UV-K5(8) set up with the modified EGZUMER firmware, and a cable to connect the radio to the antenna.
I am using version 0.22 of EGZUMER at the time of this article.
With your radio and antenna in place the rest of the setup is done using the radio’s controls.
Step 1 – Initial setup:
Power on the radio and put it in VFO mode, if it not already, by pressing “F” then “3” on the keypad. Enter 445.500 for the frequency. This will be your base frequency. You may need to try others later if the RFI can’t be locked on in the range provided. 445.500 worked in my case and got me close enough to the RFI signature to find it.
NOTE: With the expanded frequency range that the EGZUMER firmware provides you can hunt on many bands. However, keep in mind that a 70cm Yagi will lose directionality on lower bands like 2m. Operating on the band the antenna is cut for is ideal. The UV-K5 doesn’t have much, if any, filtering on bands outside of 2m and 70cm.
Step 2 – Enter Spectrum Scan mode:
Press “F” and then “5” to enter Spectrum Scan mode. The screen should look like this:
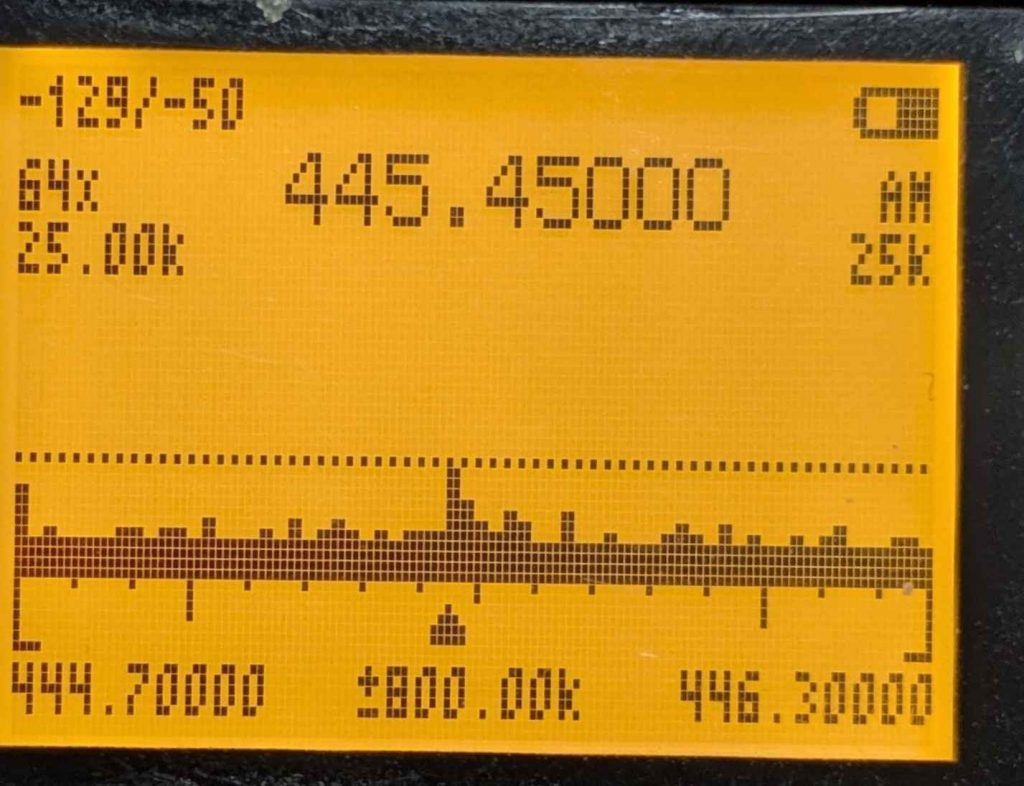
Press “0” to toggle to AM mode and then use the “*” and “F” keys to adjust the dotted bar on the screen up or down. This is your squelch level. Only peaks on the spectrum scope that break the dotted line will produce audio. Lower it until the highest peak breaks squelch. Listen and hear if it is the RFI you are hunting for or something else. If it is not the RFI, press “Side Button I” to exclude it and keep adjusting the squelch while directing the antenna to where you think the RFI is, in an attempt to lock on the RFI signal. You may need to move frequencies multiple times before locking on to the RFI signal.
The Spectrum Scan mode button functions (taken from the EGZUMER wiki page):

1 / 7 - increases/decreases frequency step between consecutive bars
4 - toggles the number of bars (channels) in the graph
2 / 8 - increases/decreases frequency step size by which the graph is scrolled with UP/DOWN buttons
5 - shows a frequency input box for lower sweep frequency (value in MHz, * - decimal point)
3 / 9 - increases/decreases maximum dB value (vertical scale)
6 - toggles receiver bandwidth
* / F - increases/decreases squelch level
0 - toggles modulation type (FM/AM/USB)
Side Button I - excludes current frequency from the spectrum scan
Side Button II - toggles backlight
EXIT - exits to a previous screen/function
PTT - switches screen to detail monitoring of last received frequency
Step 3 – Lock in the RFI Signal
Once you have the RFI breaking the squelch of the radio and you can hear it, press the PTT button to enter the Detail Monitoring screen. This will lock the frequency and is where you’ll attenuate the signal so that you can determine it’s origin. The rest of the RFI hunting is done from this screen.
Step 4 – Detail Monitoring Mode
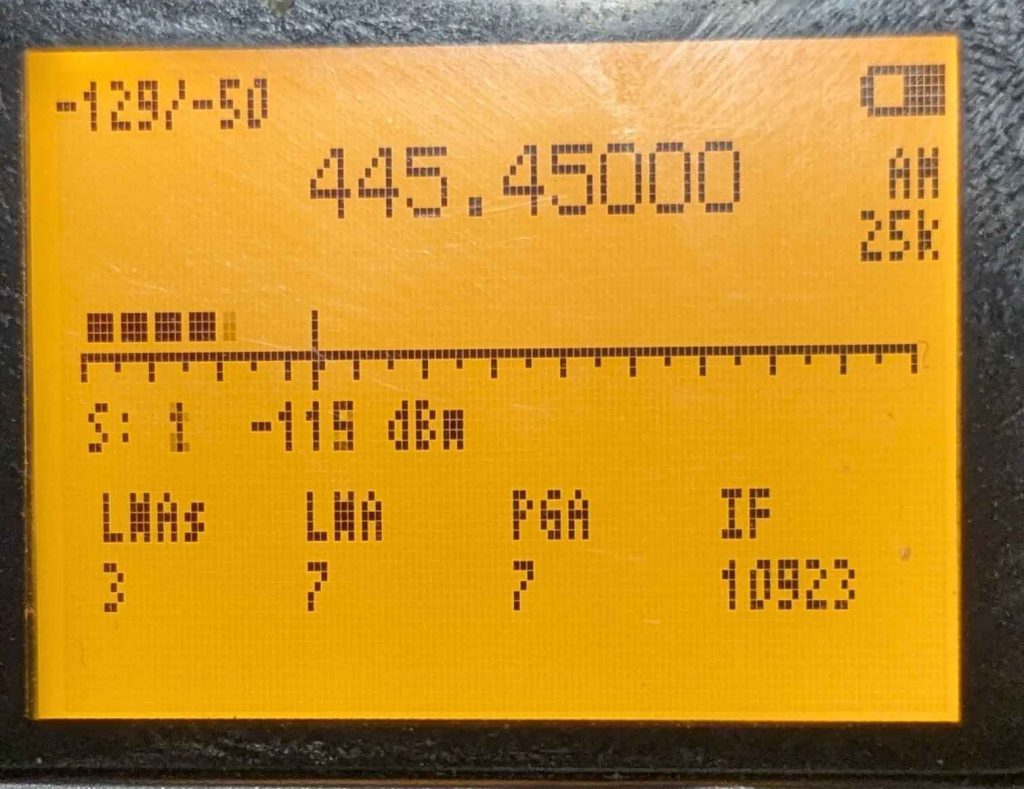
In the Detail Monitoring screen, you will see the locked frequency, the signal strength bar, represented by the large black dots, and the S-meter with dBm readings. The vertical line on the signal strength bar scale is the squelch level, this is controlled with the “*” and “F” keys as it was on the Spectrum Scan mode screen. Set the squelch level so that the RFI signal just breaks squelch, then move the antenna from one point of interest to the other. Hopefully it will break squelch in one direction and not any other. This is what you want.
A note on effectively RFI Hunting with the N8GMZ RFI Rig:
Make every attempt to get the RFI signal locked in before you go into the Detail Monitoring screen even if it takes multiple attempts from different locations. If you can’t hear it well, walk or drive around the area with the radio in the spectrum scan mode until you pick it up. Power line RFI has a distinct sound, that differs from other RFI. Turning the Yagi to change polarization angle can also be helpful in picking up the RFI signal. If you are hunting a different type of RFI, try to get a good feel for what it sounds like on your HF radio at home before looking for it outside on 70cm. You’ll want to focus on that noise and not other noises that you’ll pick up. Don’t end up chasing a signal that isn’t RFI.
Step 5 – Pinpointing the Source of the RFI
Having locked in on the RFI signature frequency by first using the Spectrum Scan mode, and then the Detail Monitoring mode. You’ll find that as you near the source of the RFI it may become too strong or too universal in all directions, to determine the actual direction. You will pick it up off the sides and the back of the antenna, hearing it all the time, and making it hard to pinpoint the origin direction.
This is when you will begin adjusting the PGA (Programmable Gain Amplifier) setting on the Detail Monitoring Screen, effectively attenuating the signal. This is done by pressing the “M” button until the PGA setting is highlighted, and then using the Up and Down button to change the value.
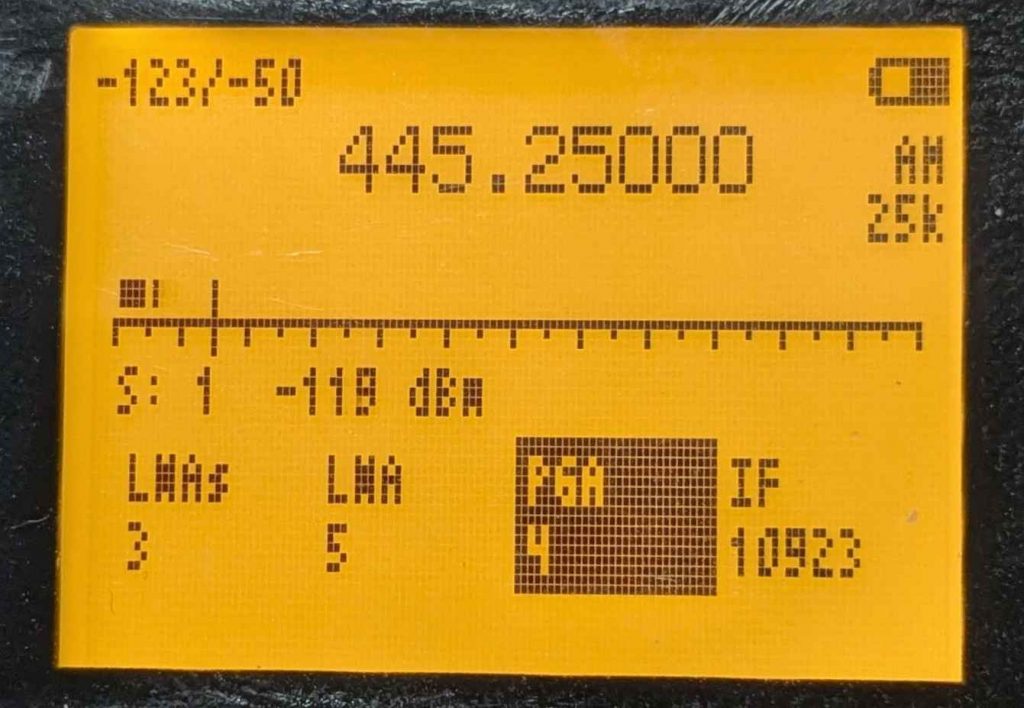
You will want to lower the PGA setting and then also lower your squelch level (using the “*” and “F” buttons). This will provide the necessary attenuation required to give the signal directionality in strength while still breaking the squelch of the radio when pointed at the strongest direction. It will also decrease your range, so you’ll want to do this when you think you are close to the source. I have played around with the LMAs and LMA settings but found the PGA makes the biggest impact on attenuation. I leave the IF setting alone.
Finding the Bad Power Pole & What to do After
Eventually (hopefully) you will narrow the RFI noise down to 2 or maybe 3 poles in a small area. Even with attenuation you may have some trouble determining which pole it is coming from and you may hear it on multiple poles, if it is loud enough. This is where you will employ a “Conquer by Dividing” method. Stand equidistant between two poles and point your antenna at each. One should be louder. Go to that pole and then past it until you are equidistant from the loud pole and the next pole. Point the antenna at each pole. If the pole you passed is still the loudest, then that is your pole.
Jeff, W4DD, gave me some great advice on doing this, “Don’t trust your ears”. Use the S-meter and watch the dBm on the screen when you’re in doubt. Sometimes it will only be a few dBm difference between two opposite directions, but the variance in number is enough to make a determination of direction, even when you can’t hear the difference.
In my case it was very obvious what pole it was when I came upon it. The RFI noise was very pronounced and was even radiating out into the guy wires that went out and down into the ground. The pole to the east was quiet, and the pole west of the problem pole had some noise, even with the PGA turned down, but using the dBm readings on the screen, you could see it was less than the primary problem pole.
Using just the small Yagi and my radio’s software controlled attenuation, I was able to determine the source of power line RFI down to a single pole. This was a huge breakthrough for me with the issues I was having, and I was glad that the rig I had built was successful and accurate.
Determining which power pole is causing the RFI is as accurate as you will be able to get with the N8GMZ RFI Rig or any Yagi/radio setup. An ultrasonic dish is needed to isolate the exact component on the pole that is noisy. It could be a lighting arrestor, a cracked insulator, a fused switch, or even the staples used to secure wire to the pole.
Some Good Advice to Note:

Jeff, W4DD, has found it's rarely a transformer that causes the noise, despite the common misconception that transformers are the largest offenders when it comes to power line RFI.
After finding the Power Line RFI
After finding the pole with the failing equipment that is causing the RFI you will want to note the pole number and the street address or cross street. If you aren’t able to narrow it down to just one pole, record both pole numbers you suspect. Then it is up to you to contact your local power company and provide them with this information.
I was lucky enough to be put in touch directly with the local field engineer, and he even let me know when he would be in the area to verify the noise. I was able to meet him and we both were able to identify the noise with our own equipment. He later emailed me and let me know that a work order had been issued for the repair to the primary suspect pole, as well as the pole next to it that was also fairly loud, but not as loud as the first.
I also reported to him a streetlight that I had identified in my searches but could not verify when the engineer was on-site. It was daytime and the pole was only noisy at night. But having seen that I was able to find RFI with my gear, he took my word that the streetlight was causing an issue and put in a repair order for it.

Jeff, W4DD, after hearing recordings of the noise I was experiencing, said it was so bad, in his opinion, that it could be from multiple sources. Even knowing this beforehand I have chosen to only address the closest source of RFI found, when is cleared up I will revisit the issue again, looking for additional sources of RFI.
Conclusion
The equipment I chose to use was financially driven but I have had repeatable success with it and plan to continue to use it to hunt RFI sources for myself and others. The low cost and effectiveness of the equipment, and the fairly straightforward operation of the radio software is appealing to me.
There are many different ways to hunt RFI using various radio equipment, like directional coax loop antennas, Kraken SDR direction finding arrays, or RFI mapping with GPS assisted software. Looking into different ways of doing it and choosing your own path can be just as rewarding and effective. I encourage you to look at what has been done, and what you can do, and make the attempt on your own. Keeping RFI out of radios is a constant struggle for many, especially with all the new electronics and gizmos in today’s world.
Update: 09/25/2024 – More gain is better!
A local ham, Russ, reached out via his club’s Groups.IO reflector, asking for help with RFI he was hearing. I jumped at the chance. We drove around his neighborhood, trying to get a lock on the RFI but with no luck. The area was a mix of above ground poles and underground runs. Exploring the area we honed in on some different RFI signals but not the telltale power line RFI that was coming into his HF radio at his QTH.
One interesting signal was found near a water treatment plant, shown below:
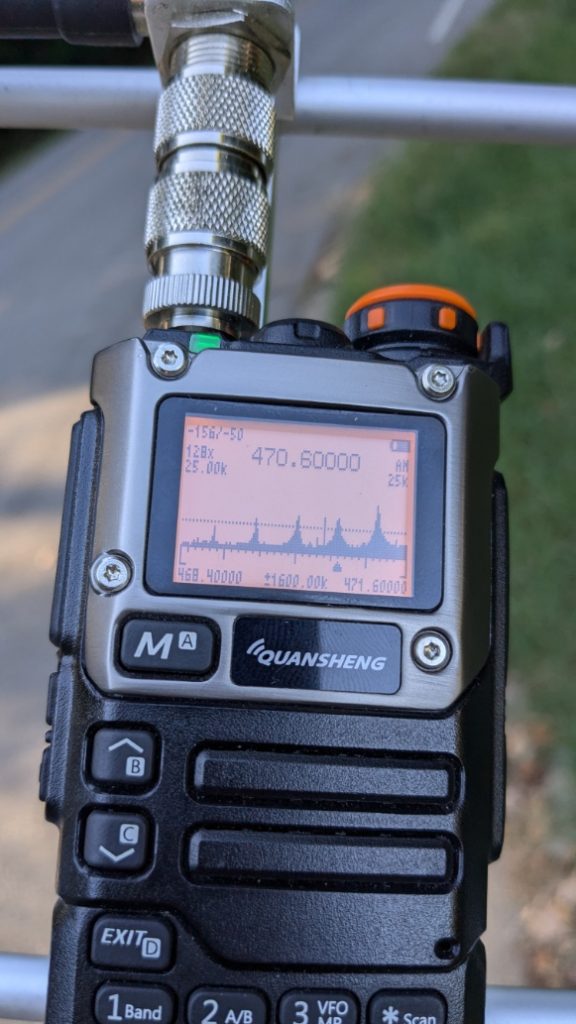
We spent about an hour or so without getting a lock on his “problem child” RFI signature. Using a remote app on his phone, Russ was able to listen to his Flex radio while we were in the field, but it just wasn’t sounding like what I was expecting to hear, or had heard in the past. It was very subdued.
Russ said that it would come and go, and that currently it wasn’t as loud as it had been previously. This was making us wonder if we were going to be able to find it when it was being as elusive as it was. We were left scratching our heads a little bit, thinking we had just been on a wild goose chase and come up empty handed. Then, while standing in the driveway, unsure if we should continue, the RFI seemed to come to life over the phone app. It was very distinctly power line noise. We began to look for it again, this time closer to the house, but I wasn’t having much luck with my rig.
Confused as to why I was unable to hear it with the UV-K5, I began to suspect that in removing the coax from the rig, and moving the radio up on the antenna, I had made things worse. Russ had a short patch cable and I installed it on the antenna. We began to sniff for RFI on the poles around his house and then, while moving the yagi around, pointing it at nearby power poles, the RFI came over the speaker clearly for the first time. Both of our eyes grew big with the discovery.
We followed the noise, eventually ending up at a pole on a side street located off the back corner of his property. Dropping the amp gain on the rig even one step would make the RFI almost completely disappear. Even with the gain all the way up, the RFI was faint, and was only audible when within 150′ or so of the suspected source. Some fiddling with the radio got the signal locked on pretty well, and we verified that the sound coming from the pole was the same as what was being heard on the HF radio. The weak RFI signal was faint into the UV-K5, and we both agreed that using an antenna with more gain could provide more definitive results, and also would have allowed us to hear the signal from further away.
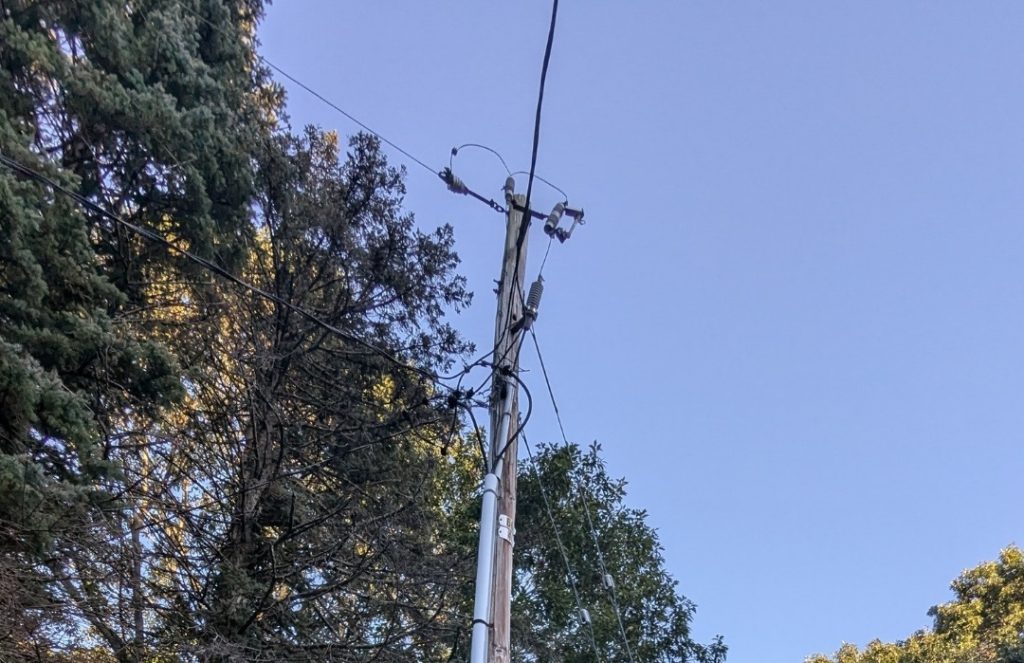
The difficulty in hearing the signal from any sort of distance made me wish I had a higher gain yagi, like the 7 element one available on Amazon for around $65:
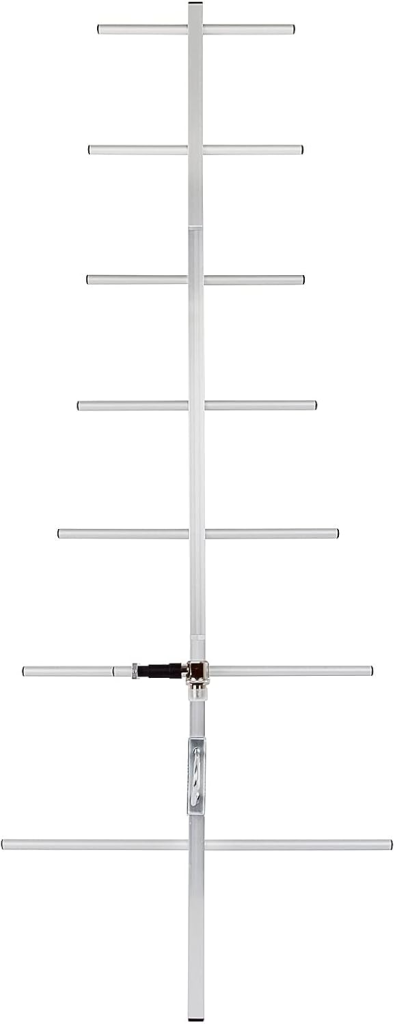
The dimensions are still appealing, as it should fit in a vehicle without disassembly. Sweeping around inside a house, the 3 element yagi is probably a nicer option though. And the price of the 7 element Yagi also pushes the boundaries on the sub-$100 price point, but if you have coax and a SMA adapter already, you should be able to get the UV-K5 and 7 element Yagi for under that.
I plan on purchasing this antenna for future use, so more updates are still to come as I continue to hunt RFI with the ever-evolving UV-K5/Yagi rig. I might find that with the higher gain I will end up needing the external attenuator to hone in on things.
The RFI we found ended up being very close to Russ’ HF antenna, and was not very loud. This was the opposite of the noise at my QTH, which was a more distant, stronger signal. It makes good sense to start close and work your way out from where you are hearing the problem RFI.
Back at Russ’ QTH, I showed him how to operate the radio, so later he could show the power company the noise, in case they could not hear it themselves. Playing around with things, we were able to hunt down and find an Amazon Fire Stick in his RV that was generating a signal. It was a good test run for him with the radio and antenna in direction finding signals. Russ unplugged the Fire stick and the noise went away. Although the Fire Stick probably wasn’t causing interference for him on HF bands, tracking down radio signals can be satisfying, almost a game. We both were in good spirits with the results we had gotten from the hunting expedition.
I left the radio with Russ while he arranged for someone to come inspect the pole, and headed home.
Russ emailed me the next day. He had gotten the power company to come out in the morning (amazing response time!) and they verified the RFI on the pole we had found. They put in a work order to replace not only all the components on the pole but the whole pole itself!
It was a happy ending to his story, and another successful hunt for me.
Footnote
After being asked about my experiences and what equipment I use for RFI hunting by various people interested in it, I decided to spend a rainy afternoon typing this all out, in the hopes that it helps someone else out there who is going through what I have been going through. I’m still learning a lot, and so this article will continue to be updated to reflect and expound on my experiences with hunting RFI.
I can be reached at CQ.N8GMZ@gmail.com
73, N8GMZ
Note: Some of the links contained in this article are affiliate links.
They have no impact on the price of the product.